-
Getting Started
-
Garmin Devices
- Garmin Device Firmware Guide
- Check Garmin Device Firmware
- Set up and Connect Garmin Index2 Scale
- Screen Control on Garmin Wearables
- How to charge Garmin devices best
- Wearable and Device ID Management
- Setup: Prepare Wearable Devices
- Compatible Garmin Devices
- Garmin Timezone & Time
- Wifi Capabilities and Restrictions of Garmin Devices
-
Setup
-
Manage
-
Data Collection
- Collect Data: Synchronization Types
- Collect Data: Tablet Sync (multi-sync) with "Fitrockr Hub (Multi-Sync)" app
- Collect Data: Smartphone Sync (single-sync) with Garmin Connect app
- Collect Data: Overview
- Collect Data: Smartphone Sync (single-sync) with Fitrockr app
- Collect Data: Sync via USB cable to Laptop
- Collect Data: Smartphone Sync (single-sync) with Omron Blood Pressure Monitors
- Apple Health and Google Health Connect
- Withings
- Wifi Capabilities and Restrictions of Garmin Devices
- Wearable Sync Methods and Frequencies
- Samsung Health
- Oura
-
Track
-
Analyze
-
Other
-
Trouble Shooting
-
Definitions
-
FAQ
- How to use HR monitor strap
- What happens when a Garmin device runs full?
- How to read Accelerometer json output file
- How to get access to Dexcom data
- Which Garmin devices support Wifi sync
- How to free up and reclaim licenses
- How to do a complete data export
- How to enable notifications on the wearable
-
Blog
Setup: Onboarding & First Steps
Follow below steps to get started with the Fitrockr platform.
Step 1: Setup Administrator Account
You can create your master administrator account as follows:
1. Open URL: https://app.fitrockr.com/
2. Click on “Setup Account”
3. Enter your contract code that you should have received from your Fitrockr contact


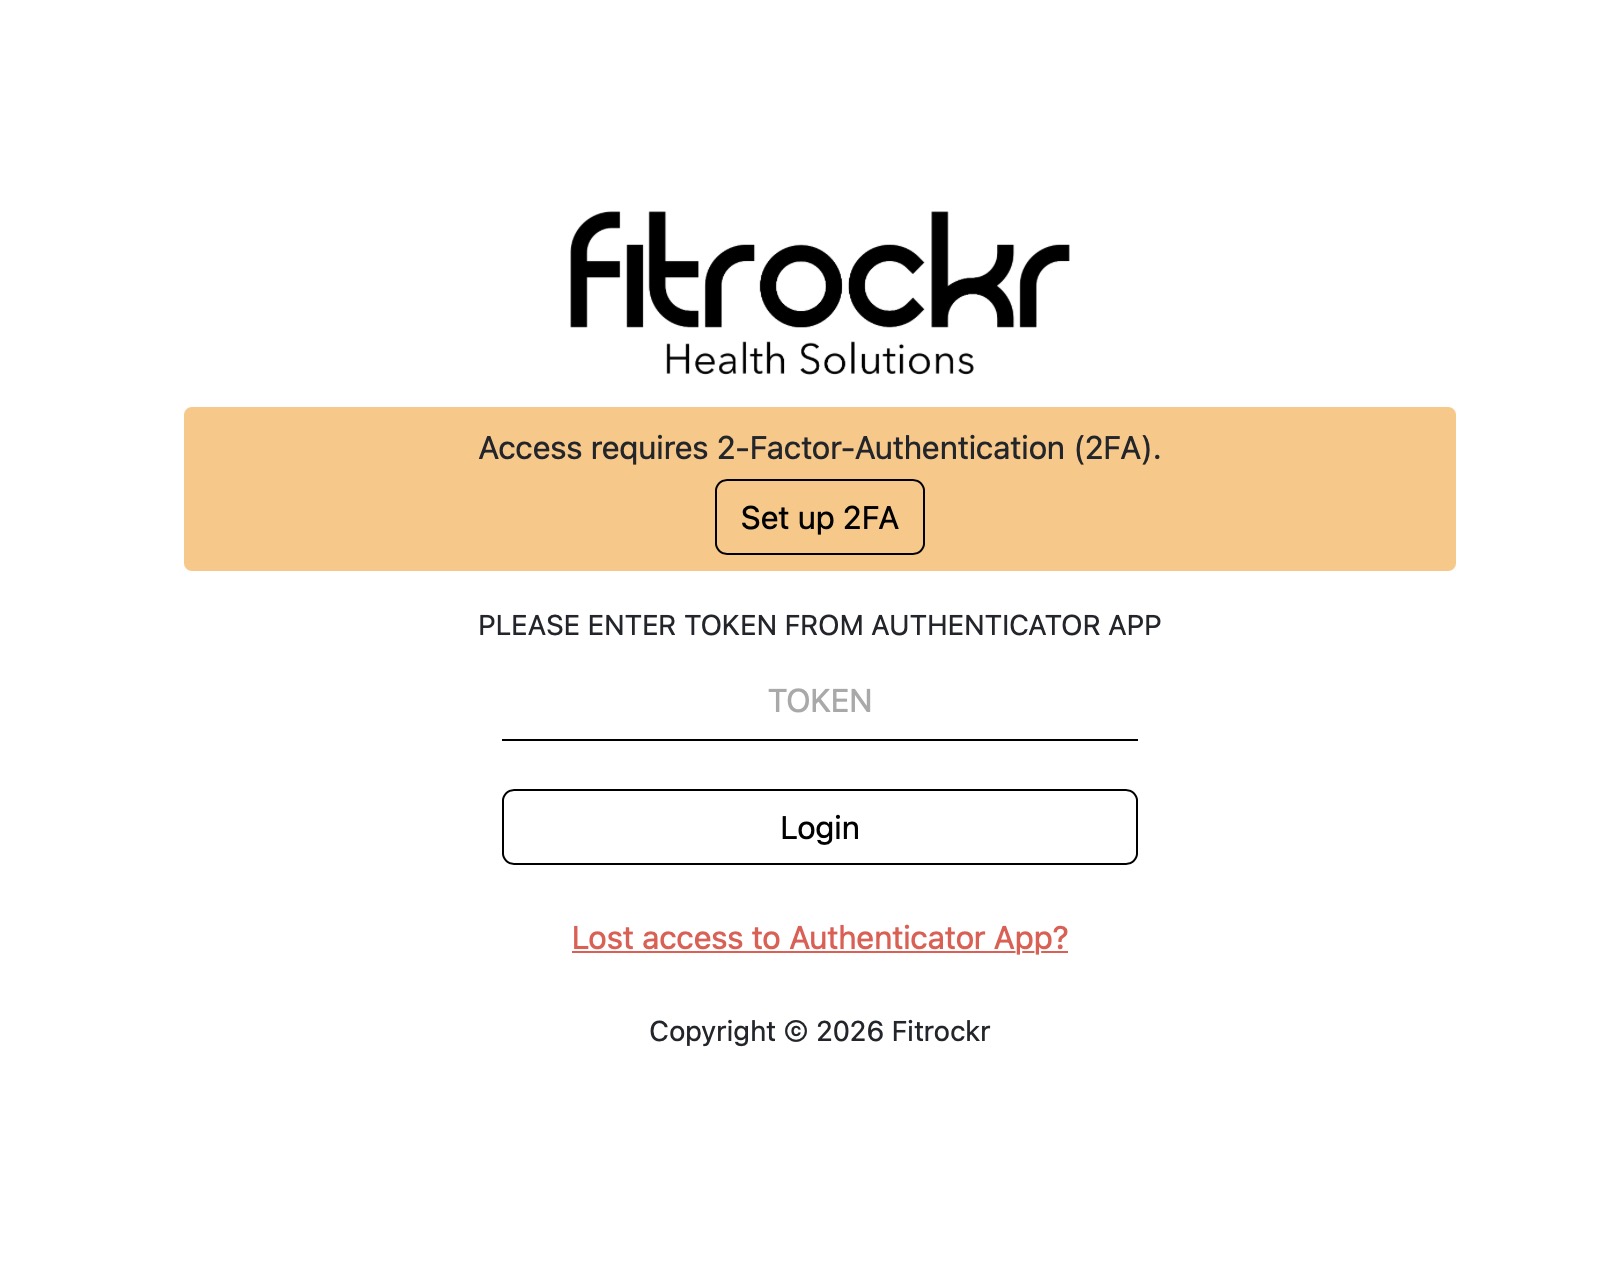
Step 2: Setup 2FA (Two-Factor-Authentication)
When you log into the Fitrockr Research & Control Center for the first time, you will be asked to setup 2FA.
You can find further details at: How to setup 2FA
Step 3: Setup Project
1. Setup your project at SETUP > PROJECTS
2. Then click “+ Create”
3. Enter a name for the Project.
4. Select Devices and configure device/app features
You can find further details at: Setup: Projects
Step 4: Invite Additional Administrators (optional)
In step 1 you created a master administrator account using the contract code. Additional administrator accounts should be set up via SETUP > STAFF.
You can find further details at: Setup: Staff
Step 5: Prepare Wearables
Only applicable if you sync Garmin wearables with the Fitrockr app!
If you sync Garmin with ‘Garmin Connect’ or other wearables (e.g. Oura, Fitbit, etc.) you can skip this step as the wearable manufacturer app will auto update wearable firmware.
When using Garmin wearables with the Fitrockr Sync app, we recommend preparing the Garmin wearables before using the platform. Objective should be to bring all devices to the same firmware version prior starting the data collection. The reason is that the Fitrockr app does not update the firmware of connected Garmin wearables.
If wearables are used with their manufacturer app (e.g. Garmin Connect), wearable firmwares are automatically updated by the manufacturer app.
You can find further details at: Prepare Garmin Wearables
IMPORTANT: Please remember that using the Fitrockr app excludes using the Garmin Connect app in parallel for the same device. You cannot use both apps at the same time!
Step 6: Create Users and Connect Wearables
Only applicable if wearables are synced with user smartphones!
Review Multi-Sync via Tablet and USB-Sync via Laptop if you are utilizing a multi-sync scenario instead without participant smartphones.
To start data collection, create users and connect wearables:
1. Go to MANAGE > USERS
2. Click on “+ Quick-Create” or “+ Create” and fill in the details.
3. To connect a wearable, click on the QR-code icon of a user.
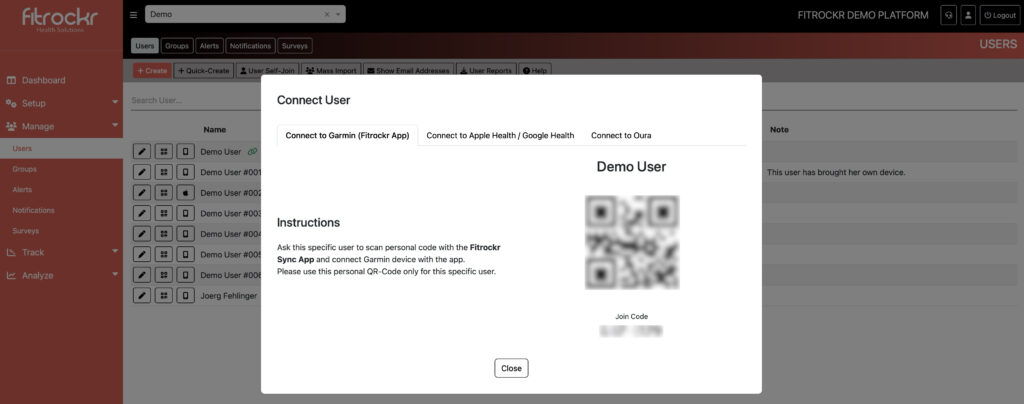
4. In the popup window, choose wearable to obtain connection instructions.
Depending on the wearable, connection will either require the user to scan a QR-Code with the Fitrockr app or do follow a link to authorize data sharing with their account in the wearable manufacturer app.
Example:
▶︎ Oura users need to download the Oura app and create a personal account. You can then send the user the Fitrockr data connection link that the user needs to confirm.
▶︎ Garmin users need to download the Fitrockr app and scan the Fitrockr connection QR-Code.
Participant experience using the Fitrockr app is described at How to Use The Fitrockr App for Syncing.
Below you find additional steps and actions that are not mandatory to use the core product but are recommended to review and consider:
Technical Issues and Defects
Please create a support ticket via the platform if you experience any issues.

Alerts
We strongly recommend setting up some basic alerts to monitor your data collection.
1. Go to MANAGE > ALERTS
2. Click on “+ Create” to create a new alert.
3. Set up a Sync alert to run every day.
4. Configure an automated notification to alert participants (requires Notifications add-on module).
5. Enable summary email report and fill in your email address or shared mailbox of admin staff. This will provide you with a daily report of pending syncs.
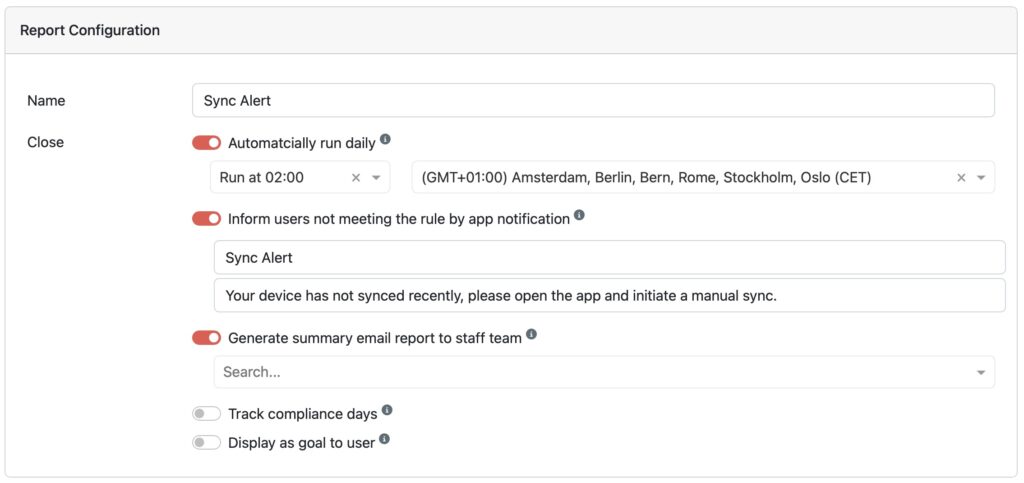
6. Assign all users (tip: create a group call ed “All Users”, assign all users to the group and assign the group to the alert).
7. Configure rule to alert if last sync is older than 2 days.
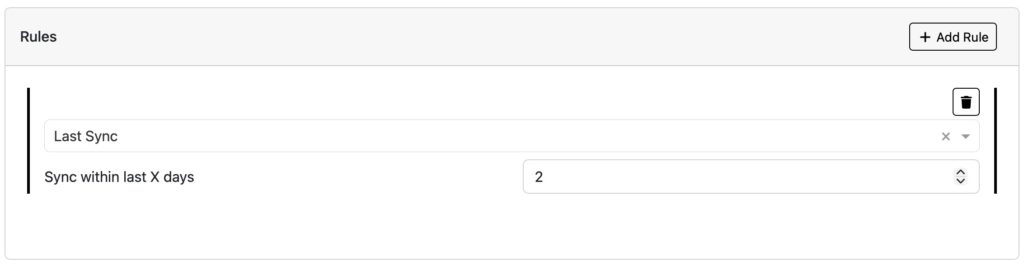
We recommend setting up a similar alert for “Wearing Time” and “Battery Level”.
See also How to Setup Alerts
Data Availability Dashboard
We strongly recommend reviewing frequently (daily/weekly) the incoming data during your data collection period, especially in the beginning. The earlier you spot issues, the easier you can fix them.
1. Go to TRACK > DATA AVAILABILITY DASHBOARD
2. View the data availability
3. Follow-up with participants if applicable
Data Checks
We strongly recommend exporting data early in your data collection period to perform data checks. The earlier you spot issues, the easier you can fix them.
1. Go to ANALYZE > DATA EXPORT
2. Download data for selected participants
3. Review data to see if it matches expectations
See also How to Export Data
Surveys & Notifications
If you have purchased the Surveys & Notifications add-on module, review the following help guides:
Self-Reporting Heath Data
If you have purchased the Self-Reporting Health Data add-on module, review the following help guide:
Food & Nutrition Tracking
If you have purchased the Food & Nutrition Tracking add-on module, review the following help guide:
user guide creation in progress – will be available soon