-
Wearables
-
Privacy & Security
-
Data Analytics
-
API Developer Access
-
Pricing, Plans & Payment
-
User Guides for Fitrockr Platform v2
-
- How to select the best device for your project
- Prepare Wearable Devices
- Set up data collection profile
- Set up participant in-app consent
- Create new user account
- Influence of profile information on data collection accuracy
- Generate QR Code for Fitrockr Hub participants
- Collect Data: Smartphone Sync (single-sync) with Fitrockr Hub app
- Trouble shoot device pairing
- Check synchronisations
- Use Notifications
- Use Questionnaires
- Wearable and Device ID Management
- Sleep Recording with Garmin Devices
- Standard Reports
- Sleep Report
- 6 Minute Walk Test
- HRV Report
- Background Sync
- Body Battery Report
- Data Dictionary
- Use Garmin HRM PRO Monitor
- Fitrockr API
- View user health data
- Export raw data
- Set Goals for Fitrockr Hub App
- Configure alert monitor
- Show all articles ( 12 ) Collapse Articles
-
- How to select the best device for your project
- Prepare Wearable Devices
- Set up data collection profile
- Create new user account
- Influence of profile information on data collection accuracy
- Collect Data: Tablet Sync (multi-sync) with Fitrockr Hub app
- Trouble shoot device pairing
- Check synchronisations
- Reassign device to another user
- Wearable and Device ID Management
- Sleep Recording with Garmin Devices
- Standard Reports
- Sleep Report
- 6 Minute Walk Test
- HRV Report
- Body Battery Report
- Data Dictionary
- Use Garmin HRM PRO Monitor
- Fitrockr API
- View user health data
- Export raw data
- Configure alert monitor
- Trouble shoot syncing issues for multi device sync (multi-sync)
- Show all articles ( 8 ) Collapse Articles
-
- How to select the best device for your project
- Create new user account
- Connect with Garmin Connect
- Check synchronisations
- Fetch historic Garmin Connect data
- Configure alert monitor
- Standard Reports
- Sleep Report
- 6 Minute Walk Test
- Body Battery Report
- View user health data
- HRV via Garmin Connect Sync
- Sleep Recording with Garmin Devices
- Export raw data
- Data Dictionary
- Use Garmin HRM PRO Monitor
- Fitrockr API
- Show all articles ( 2 ) Collapse Articles
-
- Quick step overview for USB upload
- How to select the best device for your project
- Prepare Wearable Devices
- Set up data collection profile
- Create new user account
- Transfer settings to device for USB sync
- Collect Data: Tablet Sync (multi-sync) with USB cable
- Sync via USB cable to Laptop
- Influence of profile information on data collection accuracy
- Wearable and Device ID Management
- Sleep Recording with Garmin Devices
- Standard Reports
- Sleep Report
- 6 Minute Walk Test
- HRV Report
- Body Battery Report
- Data Dictionary
- Use Garmin HRM PRO Monitor
- Fitrockr API
- View user health data
- Check synchronisations
- Export raw data
- Trouble shoot device pairing
- Configure alert monitor
- Show all articles ( 9 ) Collapse Articles
-
-
User Guides for Fitrockr Platform v3
- Prepare Wearable Devices
- Setup: Projects
- Setup: Staff
- Manage: Users
- Manage: Groups
- Manage: Alerts
- Manage: Notifications
- Manage: Questionnaires
- Collect Data
- Analyze Data
- Fitrockr API
- Track: Compliance Dashboard
- Track: Device Synchronisation
- Analyze: Data Export
- Analyze: Standard Reports
- Analyze: Sleep Analysis
- Analyze: 6 Minute Walk Test
- Analyze: Body Battery
- Analyze: HRV
- Analyze: Activities
- Set and Track Goals
- Show all articles ( 6 ) Collapse Articles
Analyze: Artificial Intelligence Module (AI)
The Fitrockr Artificial Intelligence Module (AI) allows researchers to apply machine learning to identify and predict data patterns.
Step 1 – Setup AI Engine
In the first step, the AI engine is setup.

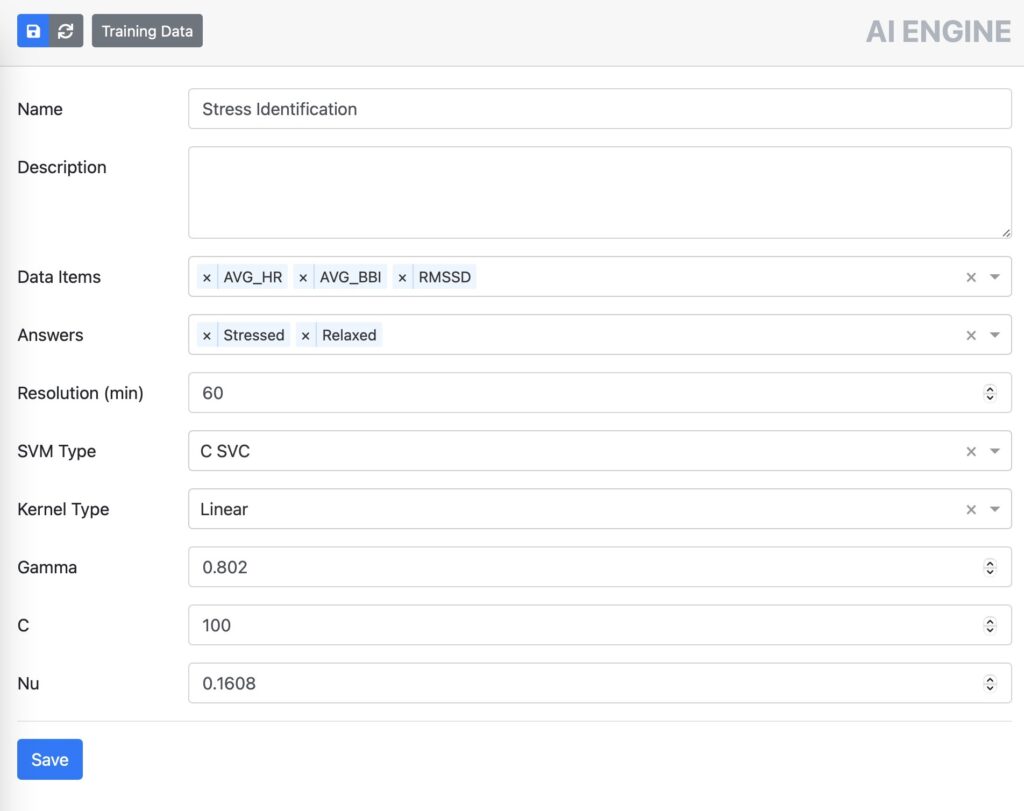
Name – name of engine.
Description – description of engine.
Data items – select which data attributes should be used by the engine:
AVG HR
MIN HR
MAX HR
AVG STRESS
MIN STRESS
MAX STRESS
MIN BBI
AVG BBI
MAX BBI
SDNN
RMSSD
SD1 SD2
DEVIATION LARGER 50MS
LF HF RATIO
Answers – define how to classify the combination of data items for each data recording. For instance, if you want to ask participants whether they were “stressed” or “relaxed” in specific situations, you can add these “answers” and flag the data items during AI training.
Resolution (min) – define in which frequency data should be classified.
SVM Type, Kernel Type, Gamma, NU – leave these settings as default unless you are an AI expert and know exactly how to adjust them.
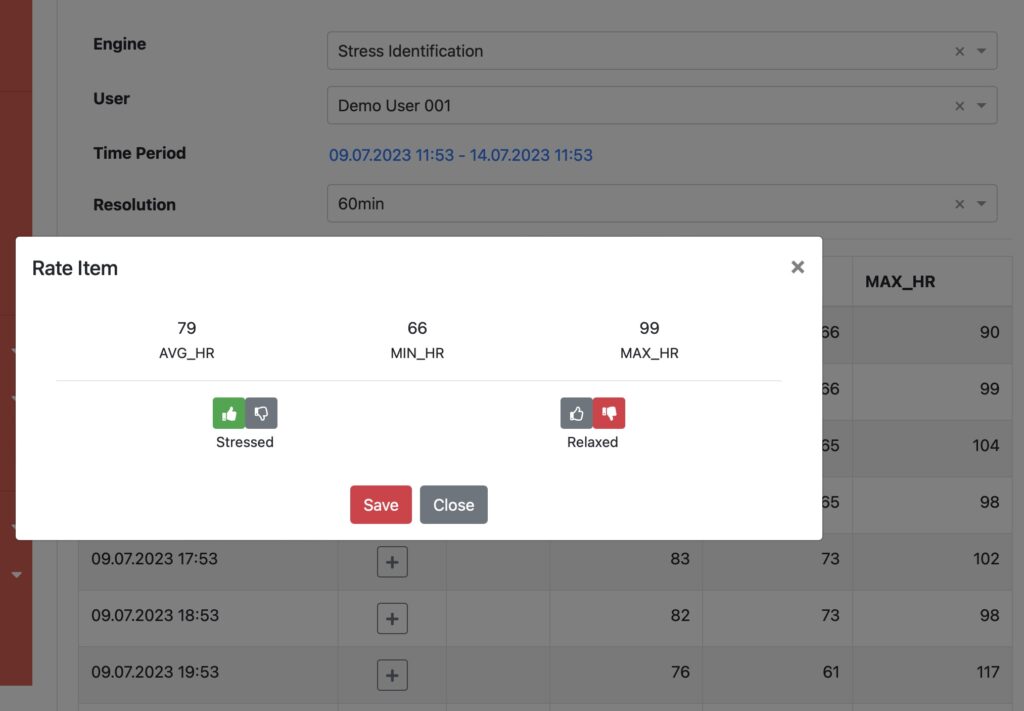
Step 2 – Conduct AI Training
In the second step, the AI is trained.

Engine – select engine to be used.
User – select user that should provide the training data.
Time Period – select the data timeframe.
Resolution – select the data resolution.
Click on the refresh icon to load data. Each data set can then be trained and marked according to the engine’s answers.

Step 3 – Run AI Simulation
In the third step, run the simulation.

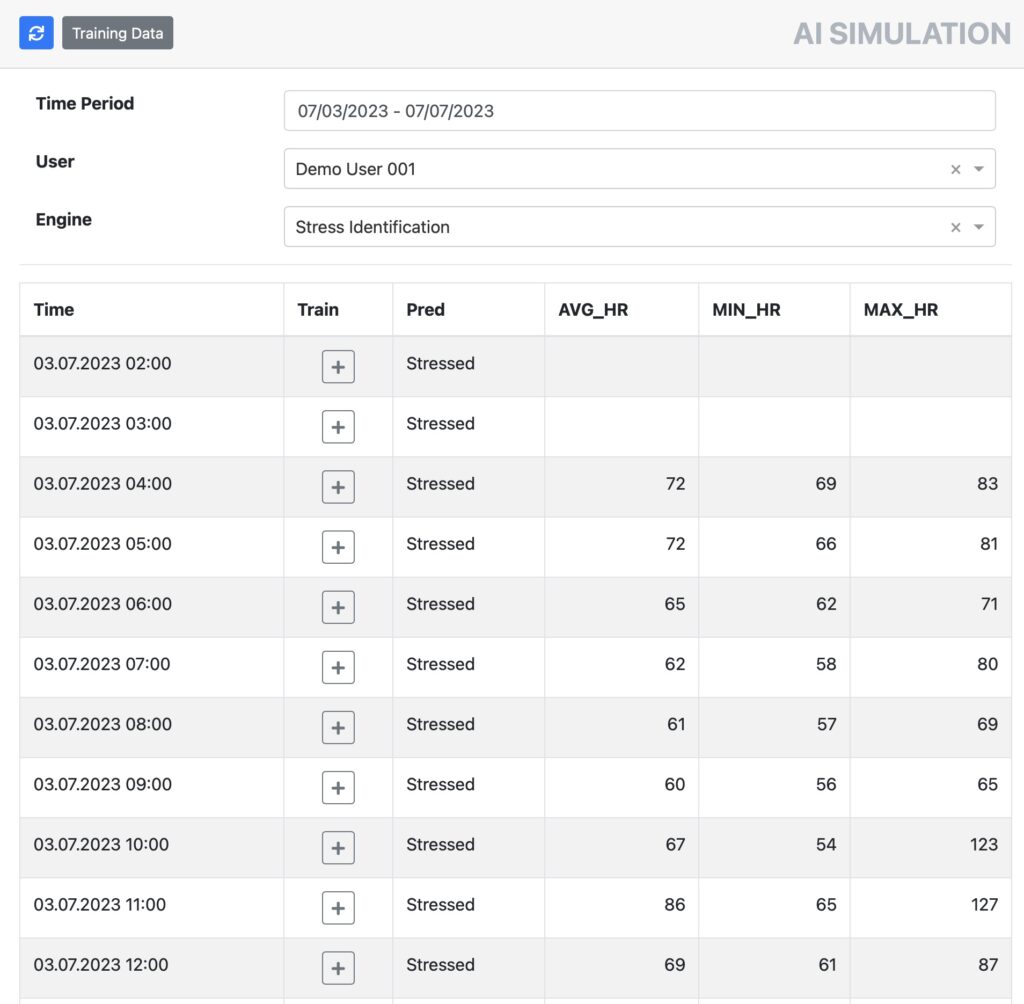
Time Period – select timeframe to be simulated.
User – select user that should be simulated.
Engine – select engine to be applied.
Click on the refresh icon to load data. Each data set will be marked with a prediction by the simulation.
Optionally, data can be further trained by clicking on the plus icon.