Fitrockr tablet sync is only compatible with the following Android tablets:
– Samsung Galaxy Tab A8 65GB version (4GB RAM)
– Xiaomi Pad 5
Alternative Android tablets can be used at own risk as functionality cannot be guaranteed. Ensure that there is at least 3GB RAM.
Please note that you can only connect up to 20 Garmin devices per tablet. If you have more than 20 devices, you need to distribute them across multiple tablets.
Setup – Pair Garmin Device
To use a Garmin device with a tablet, Garmin device needs to be known to the tablet. This is achieved by pairing the device with the tablet.
See below for alternative screenshot instructions.
Tip: activate subtitles in the video to see instructions!
Screenshot Instructions
(1) download the “Fitrockr Hub – Garmin Sync” app from the Google Play Store.
Do not mistakenly download the “Fitrockr – Fitness Challenges” or “Fitrockr Live – Data Streaming” app.
(2) open the Fitrockr Hub app.
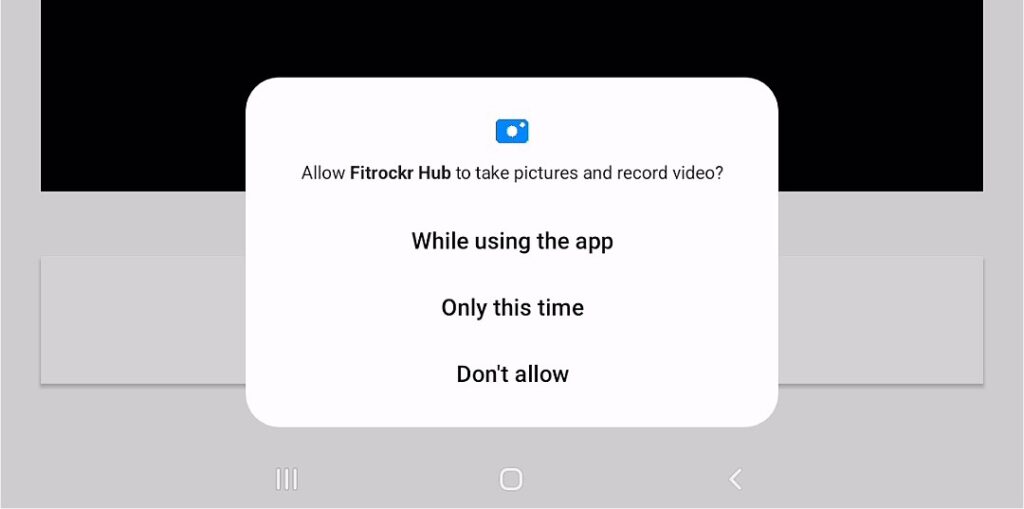
(3) approve all consents to allow app to use camera, bluetooth, etc.
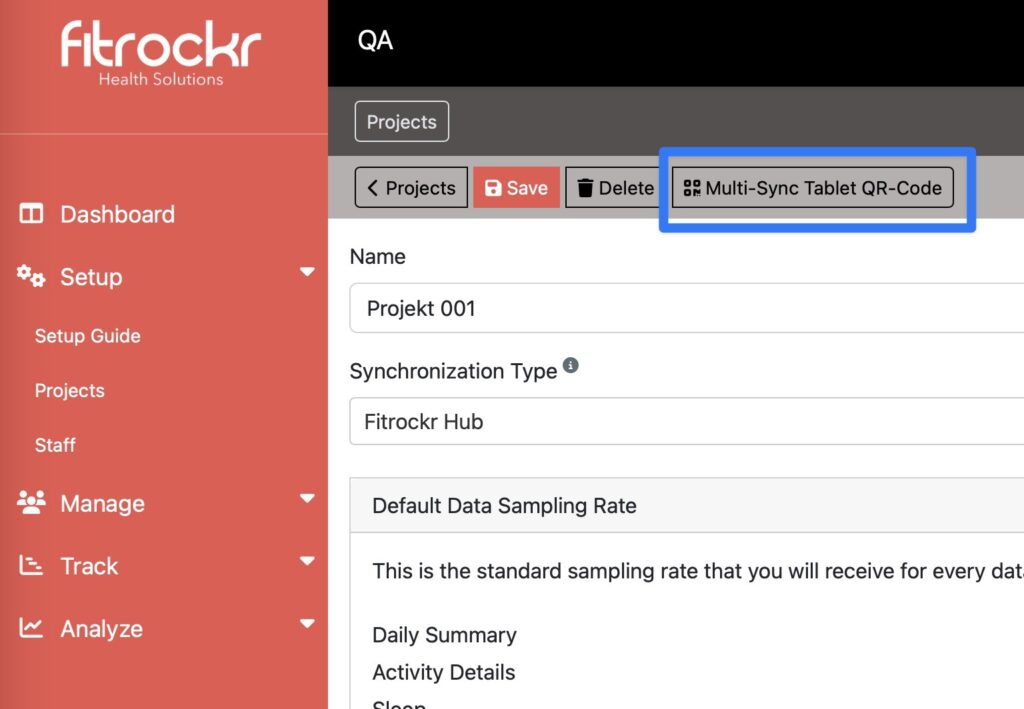
(4) get the tablet specific join-code in the Fitrockr Research & Control Center at Projects > Edit Project > Multi-Sync Tablet QR-Code.
(5) scan code with tablet.
(6) open left-side navigation and select Users.
(7) select user to connect with a Garmin device.
New users can be created by clicking on the (+) icon. Alternatively, users can be created in the Fitrockr Research & Control Center at Manage > Users.
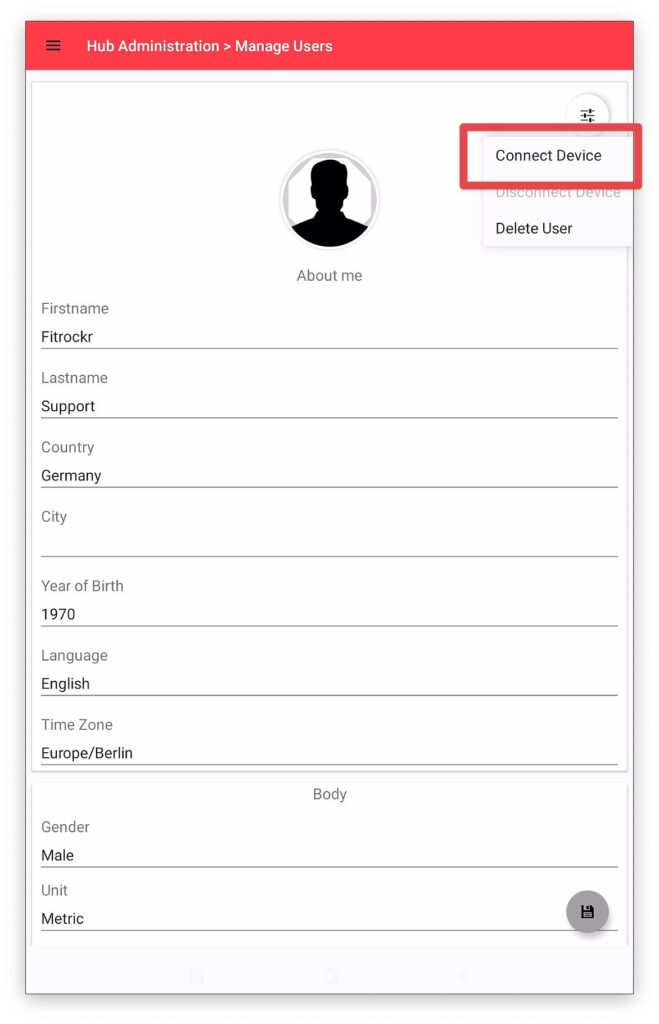
(4) Click the settings icon and select Connect Device.
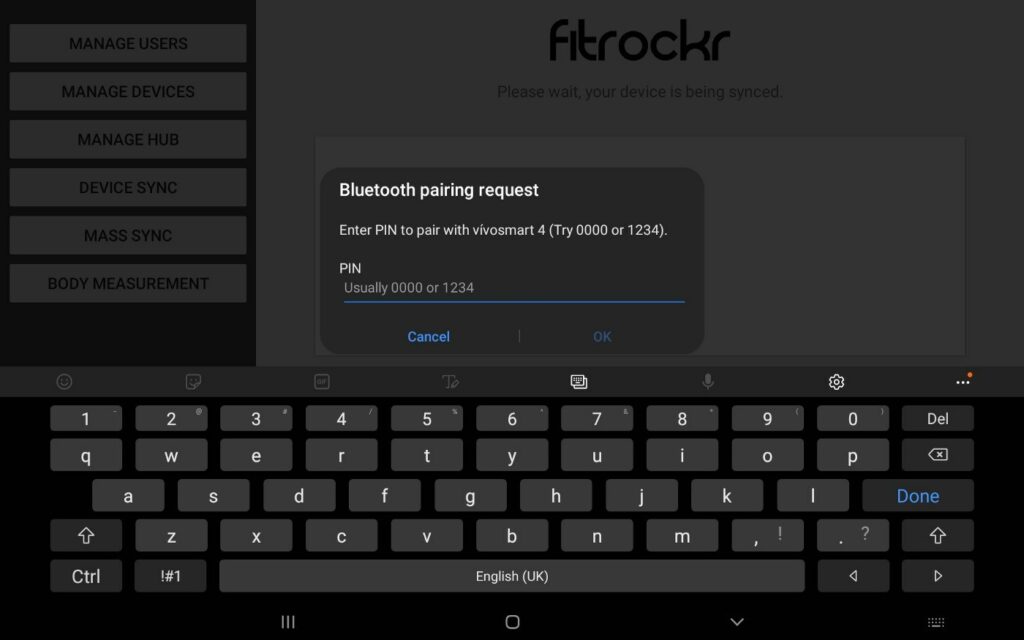
(5) Select the Garmin device from the list of available devices. If Garmin device does not appear, ensure that it is in Bluetooth Pairing mode. Please view the trouble shooting help guide in case of any issues.
For Vivofit 4 devices push the device button to activate Bluetooth.
It is highly recommended to upgrade the firmware of all Garmin devices prior using them with Fitrockr Hub and in the project. The best way to upgrade the firmware of a Garmin device is by connecting it to a computer and opening the Garmin Updater software. It will identify the Garmin device and offer the possibility to upgrade the firmware.
(6) Follow steps to pair the Garmin device.
(7) After successful pairing, wait until the device has synchronized initially. Progress is shown via the yellow banner on top of the page.
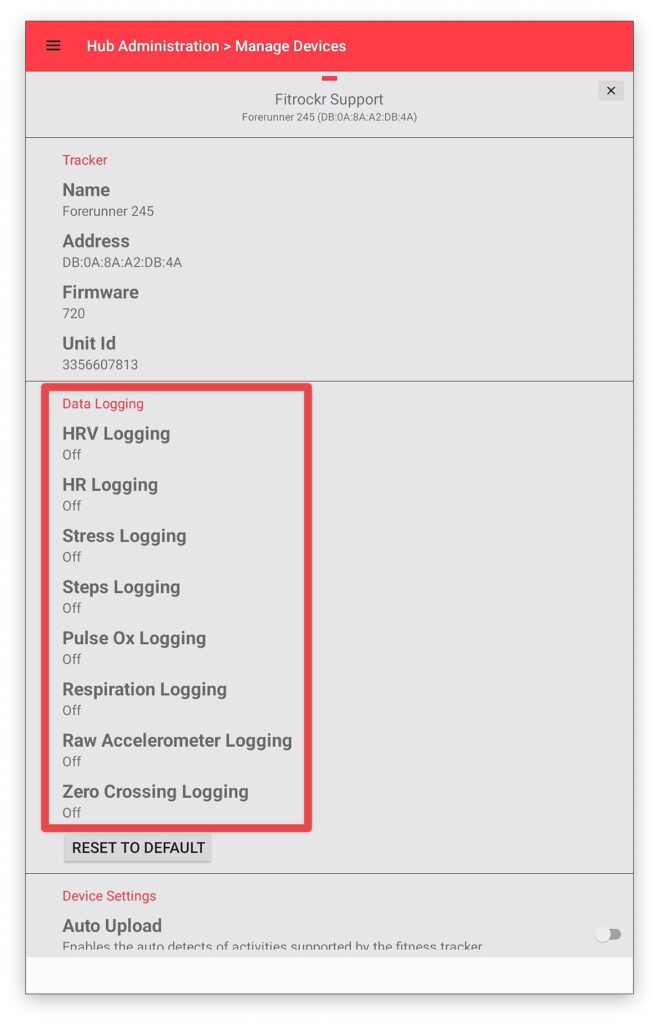
(8) Once initial sync is completed, select Device Details (either on the page where you are or go to the left-side navigation item Devices). Check whether the device has applied the correct data collection profile settings that you configured in the Fitrockr Research & Control Center at Setup > Projects.
If not, please sync device again (navigation item Sync Device).
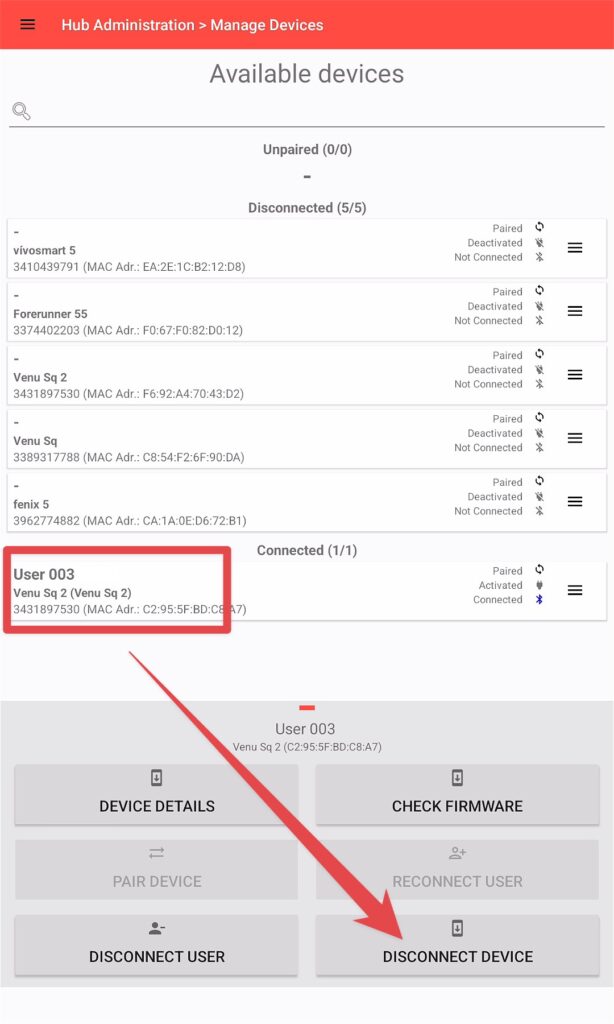
(7) Select device and click on Disconnect Device.
For Vivofit 4 devices, skip the disconnect step.
Garmin device is now set up and ready to collect data.
The reason for disconnecting the device that Android only allows up to 5 actively connected Garmin devices in parallel.
See below for alternative screenshot instructions.
Tip: activate subtitles in the video to see instructions!
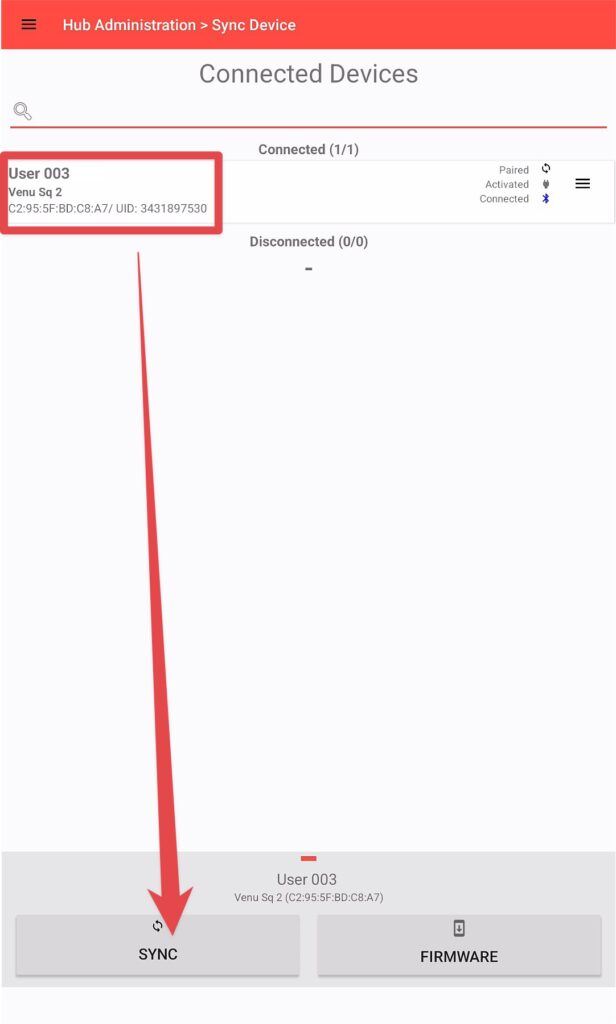
(1) open Fitrockr Hub app on the tablet.
(2) open left-side navigation and select Sync Device.
(3) select device and click on Sync.
For Vivofit 4 devices, push button first to activate Bluetooth.
Alternative Sync via USB Cable
It is also possible to connect the USB charging cable of the Garmin device to the tablet and sync a device through the cable. This comes handy for larger data amounts as sync will be much faster. You can read about the USB sync method at Tablet Sync (multi-sync) with USB cable
Mass sync devices
Video Instructions
See below for alternative screenshot instructions.
Tip: activate subtitles in the video to see instructions!
The mass sync feature will automatically sync all devices in Bluetooth range without the need to manually select each device for sync.
Please reach out to Fitrockr Support if you need the mass sync feature to be enabled.
Mass sync does not work with Vivofit 4 devices.
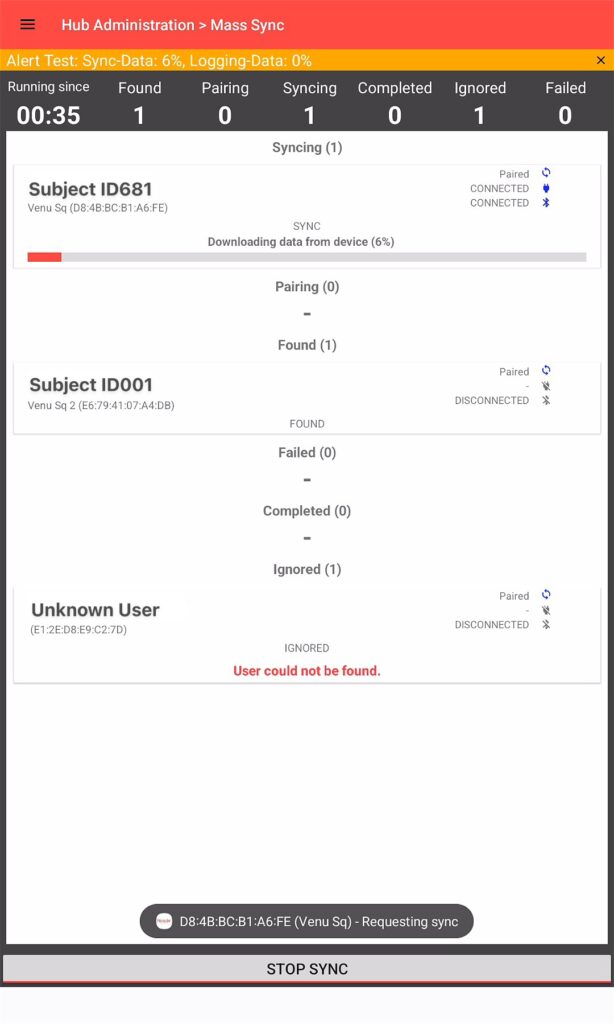
(1) open left-side navigation and select Mass Sync.
(2) ensure that all devices to be mass-synced are close-by and in Bluetooth range.
(3) click “Start Sync” to start the mass sync. Devices will be processed one by one and categorized as follows:
Syncing: device is being synchronized.
Pairing: device is being paired.
Found: devices found and queued for syncing.
Failed: devices failed to sync.
Completed: devices successfully synced.
Ignored: devices ignored; e.g. because device was not paired with tablet or admin chose device to be ignored for mass-sync.
(4) Failed syncs can be manually restarted. To do so, click on the device and select “Reschedule Device”.
(5) Once the mass sync has finished or if you want to abort it, click “Stop Sync”.
Shopping Basket
We use cookies on our website to give you the most relevant experience by remembering your preferences and repeat visits. By clicking “Accept”, you consent to the use of ALL the cookies.
This website uses cookies to improve your experience while you navigate through the website. Out of these, the cookies that are categorized as necessary are stored on your browser as they are essential for the working of basic functionalities of the website. We also use third-party cookies that help us analyze and understand how you use this website. These cookies will be stored in your browser only with your consent. You also have the option to opt-out of these cookies. But opting out of some of these cookies may affect your browsing experience.
Necessary cookies are absolutely essential for the website to function properly. This category only includes cookies that ensures basic functionalities and security features of the website. These cookies do not store any personal information.
Any cookies that may not be particularly necessary for the website to function and is used specifically to collect user personal data via analytics, ads, other embedded contents are termed as non-necessary cookies. It is mandatory to procure user consent prior to running these cookies on your website.